NVIDIA 为 CUDA 开发提供了许多强大的开发工具。在 Windows 平台上,您可以使用 Visual Studio Edition,而在 Linux 平台上,可以使用 Eclipse Edition。然而,我们经常需要在 CUDA 和其他编程语言如 Python 和 C++ 之间进行联合编程。尽管 Visual Studio 这样的 IDE 非常强大,但它往往显得过于臃肿。相比之下,我更喜欢 VSCode 这种轻量级的编辑器,它配备了各种插件。
为了支持在 VSCode 上进行 CUDA 开发,NVIDIA 提供了 Nsight Visual Studio Code Edition 插件。这个插件为 .cu 文件提供了语法高亮、自动补全、智能提示、函数跳转、调试等功能。现在,基于 VSCode,我们也可以愉快地进行 CUDA 编程啦。
本文将详细介绍如何通过本地 VS Code 远程连接到 Linux 系统来配置 CUDA 开发环境的步骤。
前置条件
本地系统
- 在本地系统中安装VSCode
- 安装Remote Development插件包并配置到服务器的远程连接
远程服务器
- 服务器需配备NVIDIA GPU
- 安装CUDA-Toolkit
- 在VSCode中安装C/C++插件
- 在VSCode中安装Nsight Visual Studio Code Edition插件
正式步骤
配置环境的本质在于完成两项工作:
- 添加构建任务,使用
nvcc来编译.cu文件。 - 添加调试配置,使用
cuda-gdb对 CUDA 代码进行调试。
在 VSCode 中连接到远程服务器并打开项目文件夹,创建 src 文件夹,并在该文件夹下创建 hello.cu 文件,添加如下代码:
#include <iostream>
#include <math.h>
// Kernel function to add the elements of two arrays
__global__ void add(int n, float *x, float *y)
{
    int index = threadIdx.x;
    int stride = blockDim.x;
    for (int i = index; i < n; i += stride)
        y[i] = x[i] + y[i];
}

int main(void)
{
    int N = 1 << 20;
    float *x, *y;

    // Allocate Unified Memory – accessible from CPU or GPU
    cudaMallocManaged(&x, N * sizeof(float));
    cudaMallocManaged(&y, N * sizeof(float));

    // initialize x and y arrays on the host
    for (int i = 0; i < N; i++)
    {
        x[i] = 1.0f;
        y[i] = 2.0f;
    }

    // Run kernel on 1M elements on the GPU
    add<<<1, 256>>>(N, x, y);

    // Wait for GPU to finish before accessing on host
    cudaDeviceSynchronize();

    // Check for errors (all values should be 3.0f)
    float maxError = 0.0f;
    for (int i = 0; i < N; i++)
        maxError = fmax(maxError, fabs(y[i] - 3.0f));
    std::cout << "Max error: " << maxError << std::endl;
    std::cout << "Hello, World6666!" << std::endl;

    // Free memory
    cudaFree(x);
    cudaFree(y);

    return 0;
}
此时,您会发现 CUDA 代码已经支持语法高亮和自动补全。通过上述步骤,您可以在 VSCode 中顺利配置并运行 CUDA 开发环境,享受轻量级编辑器带来的高效编程体验。
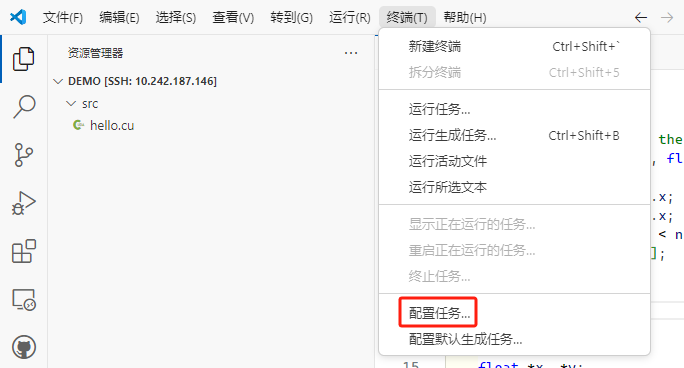
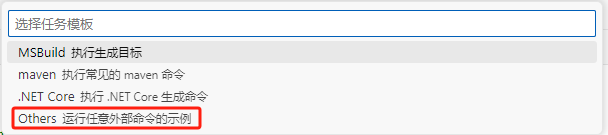
在vscode顶部的菜单栏上点击终端->配置任务,创建默认配置文件并选择其它配置

生成的默认tasks.json内容如下:
{
    // See https://go.microsoft.com/fwlink/?LinkId=733558
    // for the documentation about the tasks.json format
    "version": "2.0.0",
    "tasks": [
        {
            "label": "echo",
            "type": "shell",
            "command": "echo Hello"
        }
    ]
}
根据我们的需求对其进行修改:
{
    "version": "2.0.0",
    "tasks": [
        {
            "label": "nvccbuild",
            "type": "shell",
            "command": "nvcc",
            "args": [
                "${workspaceFolder}/src/hello.cu",
                "-o",
                "${workspaceFolder}/src/hello",
                "-g",
                "-G"
            ],
            "problemMatcher": [
                "$nvcc"
            ],
            "group": {
                "kind": "build",
            },
            "presentation": {
                "echo": true,
                "reveal": "always",
                "focus": true,
                "panel": "shared",
                "showReuseMessage": false,
                "clear": true
            }
        },
    ]
}
配置文件中的核心是 command 和 args,它们表示通过命令行编译 .cu 文件的方式,只不过我们让 VSCode 的任务来帮我们自动完成而已。每个属性的详细含义可以在 VSCode 的官方文档中查阅:VSCode 官方文档。
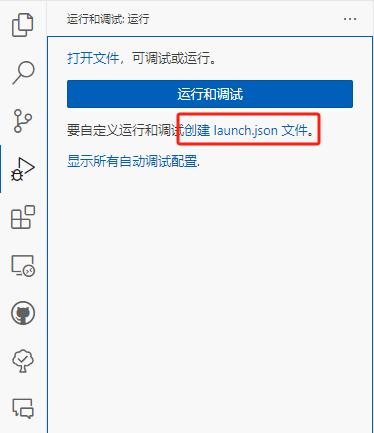
接下来添加调试配置,切换到运行和调试面板,点击创建launch.json文件
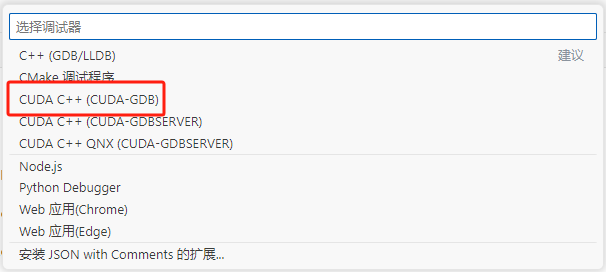
选择CUDA C++(CUDA-GDB)模板创建配置文件
默认配置文件内容如下所示:
{
    "version": "0.2.0",
    "configurations": [
        {
            "name": "CUDA C++: Launch",
            "type": "cuda-gdb",
            "request": "launch",
            "program": ""
        },
        {
            "name": "CUDA C++: Attach",
            "type": "cuda-gdb",
            "request": "attach"
        }
    ]
}
按照我们的项目内容对其进行如下修改
{
    "version": "0.2.0",
    "configurations": [
        {
            "name": "CUDA Launch",
            "type": "cppdbg",
            "request": "launch",
            "program": "${workspaceFolder}/src/hello",
            "MIMode": "gdb",
            "miDebuggerPath": "/home/bzx/local/cuda/bin/cuda-gdb",
            // "cwd": ".",
            "preLaunchTask": "nvccbuild",
        },
        {
            "name": "CUDA C++: Attach",
            "type": "cuda-gdb",
            "request": "attach"
        }
    ]
}
这里的调试工具有两种配置方式。上述推荐使用cppdbg,并在miDebuggerPath中配置cuda-gdb的路径,这样可以为vscode提供更好的调试支持。
另一种方式是直接使用cuda-gdb作为调试工具,配置如下图所示:
{
    // 使用 IntelliSense 了解相关属性。
    // 悬停以查看现有属性的描述。
    // 欲了解更多信息,请访问: https://go.microsoft.com/fwlink/?linkid=830387
    "version": "0.2.0",
    "configurations": [
        {
            "name": "CUDA Launch",
            "type": "cuda-gdb",
            "request": "launch",
            "program": "${workspaceFolder}/src/hello",
            "preLaunchTask": "nvccbuild",
        },
        {
            "name": "CUDA C++: Attach",
            "type": "cuda-gdb",
            "request": "attach"
        }
    ]
}
最后在代码中添加断点,点击调试按钮即可进行调试。
事实上,在开发大型项目时,上述的配置效率低下,一种更好的方式是使用cmake来管理项目,我会在下一篇文章中进行详细介绍。